ThreadPoolExecutor全解


导读

第一章,阐述了阅读代码的方法和ThreadPoolExecutor的继承结构,可以自己分析继承结构的朋友可以跳过本章。

第二章,详细讲解了ThreadPoolExecutor的内部运作原理,包括线程的重用、内部队列、申请新线程策略等,是本文重点。

第三章,作为补充,讲解Runnable和Thread的用法,如果你不了解Java的线程,推荐先看这章。

第四章,作为补充,讲解ThreadPoolExecutor的基本用法。

一、ThreadPoolExecutor整体结构

1. 研究方法

我们在研究面向对象源码(至少是Java源码)的时候,总应该先从继承(包括对接口的实现)关系图入手,看过Spring源码的同学一定清楚,Spring中频繁用到了非常复杂的继承技术,举个几个例子:

org.springframework.beans下的BeanWrapperImpl类的继承结构如下:

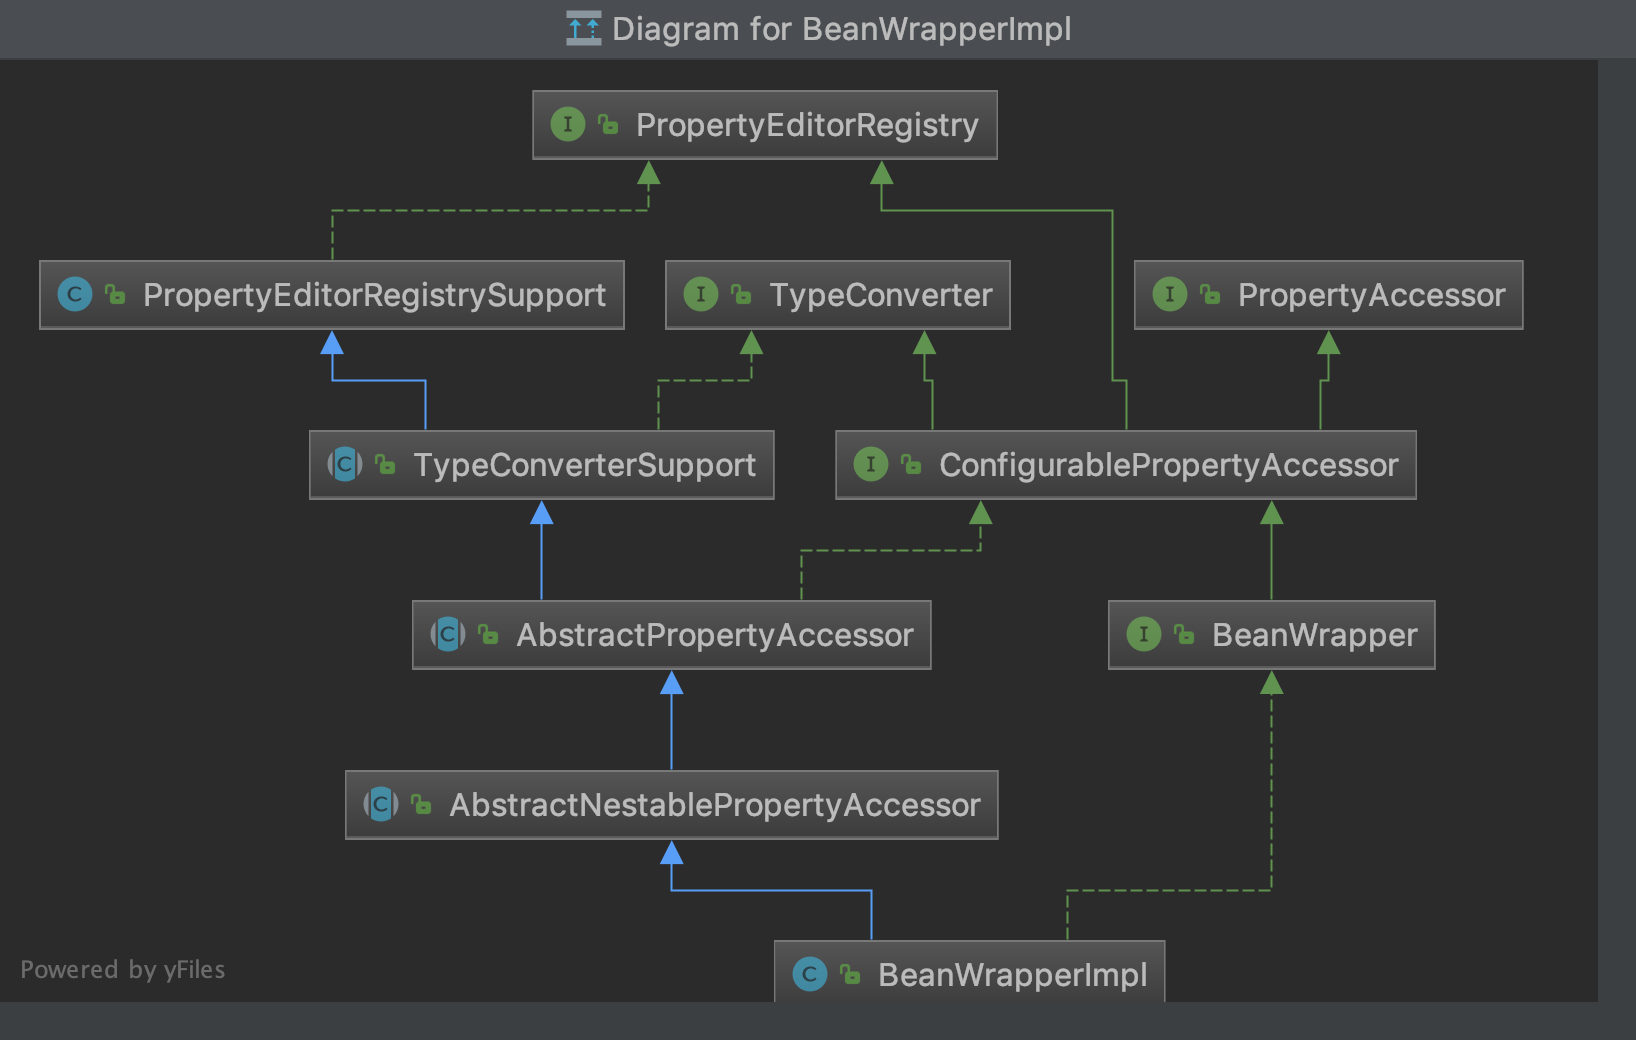
通过分析BeanWrapperImpl实现的所有接口,不难推测出BeanWrapperImpl中具体有哪些功能。当然Spring中还有很多更加复杂的继承关系,例如BeanFactory和BeanDefination等类的实现,感兴趣的朋友们可以自己研究一下,相信在仔细研读之后,对面向对象技术的理解会更加深刻。

在阅读每一个接口代码的时候,请尝试自己猜想一下,最后这些方法会怎么实现。

当然,除了宏观的类继承结构以外,细节代码的精读也是必不可少的。

2. ThreadPoolExecutor的继承结构

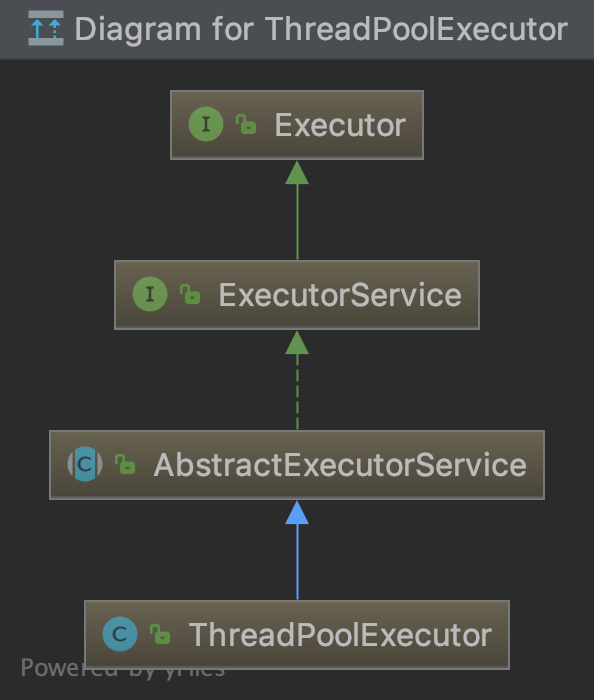
可以看到,ThreadPoolExecutor的继承结构非常简单,我们一个个来看:

Executor.java

1
2
3
public interface Executor {
void execute(Runnable command);
}

这接口很简单,只定义了一个方法execute,这个方法接受一个Runnable参数(这里假定你知道Runnable接口有关的知识,如果不了解,可以先跳转到第三章,那里会介绍Runnable接口和Thread类),可以猜想一下,实现后的execute方法里面肯定会调用这个Runnable参数的run方法。这里将一个任务抽象成了Runnable接口。

ExecutorService.java

1
2
3
4
5
6
7
8
9
10
11
12
13
14
15
16
17
18
19
20
21
22
23
24
25
26
27
28
29
30
31
32
33
34
public interface ExecutorService extends Executor {

void shutdown();

List<Runnable> shutdownNow();

boolean isShutdown();

boolean isTerminated();

boolean awaitTermination(long timeout, TimeUnit unit)
throws InterruptedException;

<T> Future<T> submit(Callable<T> task);

<T> Future<T> submit(Runnable task, T result);

Future<?> submit(Runnable task);

<T> List<Future<T>> invokeAll(Collection<? extends Callable<T>> tasks)
throws InterruptedException;

<T> List<Future<T>> invokeAll(Collection<? extends Callable<T>> tasks,
long timeout, TimeUnit unit)
throws InterruptedException;

<T> T invokeAny(Collection<? extends Callable<T>> tasks)
throws InterruptedException, ExecutionException;

<T> T invokeAny(Collection<? extends Callable<T>> tasks,
long timeout, TimeUnit unit)
throws InterruptedException, ExecutionException, TimeoutException;
}

这是ThreadPoolExecutor的核心接口了,当时这个接口还不能算作线程池,只能算作一个线程执行引擎或者说代理。接口里面定义了几个核心的方法:

  • void shutdown(); 关闭这个执行器
  • List<Runnable> shutdownNow(); 立即关闭,并返回一个Runnable集合,不妨猜想一下,这个集合是还没来得及执行的任务集合,并且shutdown()和shutdownNow()之间的执行策略会有比较大的区别
  • Future<?> submit(Runnable task); 提交一个Runnable任务
  • 其他有几个boolean方法用来判断当前状态。以及几个invokeAny和invokeAll方法,猜想一下,这两个方法用来批量执行任务

好了,现在一个任务执行器已经有了一个大致的轮廓,接下来看看具体实现。

AbstractExecutorService.java

1
2
3
4
5
6
public Future<?> submit(Runnable task) {
if (task == null) throw new NullPointerException();
RunnableFuture<Void> ftask = newTaskFor(task, null);
execute(ftask);
return ftask;
}

submit方法是最重要的方法之一,在AbstractExecutorService.java中做了简单的实现,首先检查task不能为null,然后将Runnable封装成一个RunnableFuture,最后具体的执行工作扔给了execute(Executor.java中定义的方法)方法,当我们想具体看看execute方法时,发现这个方法在这一层还没有实现。其他的实现大家可以自行阅读一下,这里不再赘述。

最后,看最核心的ThreadPoolExecutor。

二、 ThreadPoolExecutor.java源码详解

这是重头戏。

如果你不清楚ThreadPoolExecutor的基本用法请跳到第四章,本章不会介绍基本用法并会默认你已经能够使用

1. 头部的位运算

ThreadPoolExecutor类一开始有这样一段代码,其中涉及了不少的位运算,Java类库中有不少位运算出现,例如大名鼎鼎的HashMap(里面的resize方法,hash方法等),Reentrantlock中的读写锁。位运算有两个明显的好处:a.可以使用掩码对一个int数据做高位和低位运算达到压缩数据的目的、b.运算速度快。我们分析一下这里的位运算:

1
2
3
4
5
6
7
8
9
10
11
12
13
14
15
private final AtomicInteger ctl = new AtomicInteger(ctlOf(RUNNING, 0));
private static final int COUNT_BITS = Integer.SIZE - 3;
private static final int CAPACITY = (1 << COUNT_BITS) - 1;

// runState is stored in the high-order bits
private static final int RUNNING = -1 << COUNT_BITS;
private static final int SHUTDOWN = 0 << COUNT_BITS;
private static final int STOP = 1 << COUNT_BITS;
private static final int TIDYING = 2 << COUNT_BITS;
private static final int TERMINATED = 3 << COUNT_BITS;

// Packing and unpacking ctl
private static int runStateOf(int c) { return c & ~CAPACITY; }
private static int workerCountOf(int c) { return c & CAPACITY; }
private static int ctlOf(int rs, int wc) { return rs | wc; }

首先,上面这段代码将Integer.SIZE - 3也就是29赋值给COUNT_BITS,并将CAPACITY赋值为(1 << COUNT_BITS) - 1,CAPACITY这个名称在集合类库中非常常见,用来指定当前容器的能力,或者说容量上限。这里的CAPACITY并非是Integer.MAXVALUE,而是(1 << COUNT_BITS) - 1。那么目的已经呼之欲出了,对于一个int,将其高三位用作表示运行状态,低29位用于表示容器的当前大小,实现了使用一个int同时保存两种信息的功能。

1
2
private static int runStateOf(int c)     { return c & ~CAPACITY; }
private static int workerCountOf(int c) { return c & CAPACITY; }

知道了这一点,上面这两个函数的用途就非常好懂了,CAPACITY相当于掩码,c & ~CAPACITY相当于获得c的高三位,得到运行状态,c & CAPACITY用来获得c的低29位,获得当前容器大小。这里的c是什么呢?就是第一行定义的AtomicInteger ctl = new AtomicInteger(ctlOf(RUNNING, 0));变量,这个变量中同时保存了当前容器的运行状态和容器大小,并将存在于ThreadPoolExecutor的整个生命周期。

2. 还记得Executor.java中的execute方法吗?

在AbstractExecutorService中,这个方法在submit方法中被调用了,但是我们没有找到它的实现,我们猜想,这个方法一定在子类中实现了。这是典型的模板方法模式

前面讲过,ThreadPoolExecutor中最重要的方法之一就是submit方法,这个方法告诉我们怎么提交一个新的任务,并使用各种策略去执行它(使用coreThread?加入队列?或者创建一个新的线程去执行?)。

在ThreadPoolExecutor中,我们如愿以偿的找到了execute的实现:

1
2
3
4
5
6
7
8
9
10
11
12
13
14
15
16
17
18
19
20
public void execute(Runnable command) {
if (command == null)
throw new NullPointerException();

int c = ctl.get();
if (workerCountOf(c) < corePoolSize) {
if (addWorker(command, true))
return;
c = ctl.get();
}
if (isRunning(c) && workQueue.offer(command)) {
int recheck = ctl.get();
if (! isRunning(recheck) && remove(command))
reject(command);
else if (workerCountOf(recheck) == 0)
addWorker(null, false);
}
else if (!addWorker(command, false))
reject(command);
}

当我们调用了submit方法提交一个任务后,最后任务的执行是在这段代码中。

这段代码干了三件事:

  • 如果当前线程池(或者说容器)中的线程数少于corePoolSize,则调用addWorker(command, true)去创建一个核心线程,并执行任务。
  • 如果当前核心线程数以满,则将新的任务放进缓存队列,等待执行。
  • 如果加入队列失败,则调用addWorker(command, false)开启一个非核心线程去执行任务。

从这段代码我们清楚了线程池对核心线程和非核心线程的生成策略:首先如果当前核心线程数小于设置的corePoolSize,则无论已有的核心线程是否空闲,优先选择新生成一个核心线程去完成新的任务;如果核心线程数量已经达到corePoolSize,则尝试将任务扔进内部的等待队列,看是否有空闲的核心线程去执行任务;如果加入等待队列失败,则创建一个临时线程去执行任务,临时任务在完成任务后,等待keepAliveTime的时间看是否有新任务,如果没有新任务则关闭这个临时线程。

3. addWorker()方法

其中有一个关键方法:addWorker,这里先贴出方法签名,第一个参数表示将要执行的任务,第二个参数表示新添加的线程是否是一个core线程。

1
2
3
4
5
6
7
8
9
10
11
12
13
14
15
16
17
18
19
20
21
22
23
24
25
26
27
28
29
30
    private boolean addWorker(Runnable firstTask, boolean core) {
// 省略了一些控制代码
....

boolean workerStarted = false;
boolean workerAdded = false;
Worker w = null;
try {
w = new Worker(firstTask);
final Thread t = w.thread;
if (t != null) {
final ReentrantLock mainLock = this.mainLock;
mainLock.lock();
try {
// 控制代码,暂且忽略
....
} finally {
mainLock.unlock();
}
if (workerAdded) {
t.start();
workerStarted = true;
}
}
} finally {
if (! workerStarted)
addWorkerFailed(w);
}
return workerStarted;
}

可以看到,这段代码首先new了一个Worker,Worker是什么呢?在创建的时候,往构造函数里面传入了我们需要执行的task(一个Runnable对象),在下面的代码中,通过final Thread t = w.thread;得到了一个Thread类,可以猜想一下,Worker是对Runnable的封装,并在Worker内部创建了一个新的Thread。后面一堆控制代码暂且不看,最后有:

1
2
3
4
if (workerAdded) {
t.start();
workerStarted = true;
}

workerAdded表示Worker是否成功创建,然后调用刚刚从新的Worker获得线程的start方法,启动这个新的线程,并标志新的Worker是否成功。

4. Worker内部类

1
2
3
4
5
6
7
8
9
10
11
12
13
14
15
16
17
18
19
20
21
22
23
24
25
26
27
28
29
30
31
32
33
34
35
36
37
38
39
40
41
42
43
44
45
46
47
48
49
50
51
52
53
54
55
56
57
58
59
60
61
62
63
64
65
66
67
68
69
70
private final class Worker
extends AbstractQueuedSynchronizer
implements Runnable
{
/**
* This class will never be serialized, but we provide a
* serialVersionUID to suppress a javac warning.
*/
private static final long serialVersionUID = 6138294804551838833L;

/** Thread this worker is running in. Null if factory fails. */
final Thread thread;
/** Initial task to run. Possibly null. */
Runnable firstTask;
/** Per-thread task counter */
volatile long completedTasks;

/**
* Creates with given first task and thread from ThreadFactory.
* @param firstTask the first task (null if none)
*/
Worker(Runnable firstTask) {
setState(-1); // inhibit interrupts until runWorker
this.firstTask = firstTask;
this.thread = getThreadFactory().newThread(this);
}

/** Delegates main run loop to outer runWorker */
public void run() {
runWorker(this);
}

// Lock methods
//
// The value 0 represents the unlocked state.
// The value 1 represents the locked state.

protected boolean isHeldExclusively() {
return getState() != 0;
}

protected boolean tryAcquire(int unused) {
if (compareAndSetState(0, 1)) {
setExclusiveOwnerThread(Thread.currentThread());
return true;
}
return false;
}

protected boolean tryRelease(int unused) {
setExclusiveOwnerThread(null);
setState(0);
return true;
}

public void lock() { acquire(1); }
public boolean tryLock() { return tryAcquire(1); }
public void unlock() { release(1); }
public boolean isLocked() { return isHeldExclusively(); }

void interruptIfStarted() {
Thread t;
if (getState() >= 0 && (t = thread) != null && !t.isInterrupted()) {
try {
t.interrupt();
} catch (SecurityException ignore) {
}
}
}
}

可以看到,Worker本身也是一个Runnable,看看其构造函数:

1
2
3
4
5
 Worker(Runnable firstTask) {
setState(-1); // inhibit interrupts until runWorker
this.firstTask = firstTask;
this.thread = getThreadFactory().newThread(this);
}

当接收到一个Runnable任务firstTask后,首先是持有了这个任务,这里注意,然后调用getThreadFactory().newThread(this)获得一个新的线程,传入的是this(一个Worker,Worker实现了Runable)而不是持有的任务。

当调用addWorker调用t.start();的时候,这个线程开始执行Worker的run方法:

1
2
3
public void run() {
runWorker(this);
}

这里调用了外部类的runWorker方法,并又将自己(Worker)作为参数传入了其中,这个Worker持有了我们真正需要执行的任务:firstTask。

5. runWorker(Worker w)方法

希望你没有晕,这里确实有点绕,在仔细阅读runWorker之前,我们先捋一下,假设现在核心线程数小于corePoolSize,当我们调用一个ThreadPoolExecutor的submit方法之后都发生了什么:

  • 调用submit方法,提交一个任务
  • 执行submit内部的execute方法去执行任务
  • execute方法调用addWorker,传入需要执行的任务,封装成一个Worker内部类对象
  • addWorker创建Worker成功后,获取其线程,调用t.start启动
  • t.start启动线程后,开始执行Worker的run方法
  • run方法实际执行的是外部类的runWorker(Worker w)方法

就到我们这里啦~,流程到这里没有想明白的话,不建议继续往下看。

1
2
3
4
5
6
7
8
9
10
11
12
13
14
15
16
17
18
19
20
21
22
23
24
25
26
27
28
29
30
31
32
33
34
35
36
37
38
39
40
41
42
43
final void runWorker(Worker w) {
Thread wt = Thread.currentThread();
Runnable task = w.firstTask;
w.firstTask = null;
w.unlock(); // allow interrupts
boolean completedAbruptly = true;
try {
while (task != null || (task = getTask()) != null) {
w.lock();
// If pool is stopping, ensure thread is interrupted;
// if not, ensure thread is not interrupted. This
// requires a recheck in second case to deal with
// shutdownNow race while clearing interrupt
if ((runStateAtLeast(ctl.get(), STOP) ||
(Thread.interrupted() &&
runStateAtLeast(ctl.get(), STOP))) &&
!wt.isInterrupted())
wt.interrupt();
try {
beforeExecute(wt, task);
Throwable thrown = null;
try {
task.run();
} catch (RuntimeException x) {
thrown = x; throw x;
} catch (Error x) {
thrown = x; throw x;
} catch (Throwable x) {
thrown = x; throw new Error(x);
} finally {
afterExecute(task, thrown);
}
} finally {
task = null;
w.completedTasks++;
w.unlock();
}
}
completedAbruptly = false;
} finally {
processWorkerExit(w, completedAbruptly);
}
}

好了,果不其然,当Worker作为参入传入之后,立马获得真正需要执行的任务:Runnable task = w.firstTask;,如果Worker是新建的,那么task必然!=null。这里有一个循环体,我们浓缩一下,删除一些状态控制代码、锁控制代码和异常控制代码:

1
2
3
4
5
6
7
8
9
while (task != null || (task = getTask()) != null) {
try{
beforeExecute(wt, task);
task.run();
afterExecute(task, thrown);
} finally {
task = null;
}
}

这里用了一个典型的代理模式(Worker代理Runnable,Runnable是真正的task),允许在真正的task.run()方法调用之前和之后做一些自定义操作,不出意外这两个方法应该是protected的空方法:

1
2
protected void beforeExecute(Thread t, Runnable r) { }
protected void afterExecute(Runnable r, Throwable t) { }

用法是,继承一个ThreadPoolExecutor然后实现这两个方法。然后用的时候,将你自定义的类,向上转型为ThreadPoolExecutor去使用即可。

好了,最后终于执行到task.run,经历了千辛万苦,终于执行了真正任务的run方法。由于每个任务的方法只执行一次(当然,你可以在你提交的任务里面写一个循环,但是在ThreadPoolExecutor看来,每个任务都只执行一次),执行完后,令task = null,然后进入下一轮循环。可以看到,到这里Worker的第一个任务task任务已经执行完,并被GC了,但是Worker的使命还没有结束,还要继续执行其他的task。

这里也就理解了,为什么Worker被构造的时候,持有的task被命名为”firstTask”的参数持有,因为Worker创建成功后会首先去执行这个任务,再去等待执行之后的任务。

那么第一个任务执行完成后,Worker怎么继续执行其他的任务呢?请看task = getTask()

6. getTask()方法

1
2
3
4
5
6
7
8
9
10
11
12
13
14
15
16
17
18
19
20
21
22
23
24
25
26
27
28
29
30
31
32
33
34
35
36
37
private Runnable getTask() {
boolean timedOut = false; // Did the last poll() time out?

for (;;) {
int c = ctl.get();
int rs = runStateOf(c);

// Check if queue empty only if necessary.
if (rs >= SHUTDOWN && (rs >= STOP || workQueue.isEmpty())) {
decrementWorkerCount();
return null;
}

int wc = workerCountOf(c);

// Are workers subject to culling?
boolean timed = allowCoreThreadTimeOut || wc > corePoolSize;

if ((wc > maximumPoolSize || (timed && timedOut))
&& (wc > 1 || workQueue.isEmpty())) {
if (compareAndDecrementWorkerCount(c))
return null;
continue;
}

try {
Runnable r = timed ?
workQueue.poll(keepAliveTime, TimeUnit.NANOSECONDS) :
workQueue.take();
if (r != null)
return r;
timedOut = true;
} catch (InterruptedException retry) {
timedOut = false;
}
}
}

我们先看看return null会怎么样,很简单,这里返回空,runWorker方法中的循环就退出了,这个线程也就结束了。否则,调用workQueue的poll和take方法去获得一个任务,注意这两个方法都是阻塞的:

1
2
3
4
5
6
7
8
9
10
11
12
13
14
15
16
17
18
19
20
21
22
23
/**
* Retrieves and removes the head of this queue, waiting if necessary
* until an element becomes available.
*
* @return the head of this queue
* @throws InterruptedException if interrupted while waiting
*/
E take() throws InterruptedException;

/**
* Retrieves and removes the head of this queue, waiting up to the
* specified wait time if necessary for an element to become available.
*
* @param timeout how long to wait before giving up, in units of
* {@code unit}
* @param unit a {@code TimeUnit} determining how to interpret the
* {@code timeout} parameter
* @return the head of this queue, or {@code null} if the
* specified waiting time elapses before an element is available
* @throws InterruptedException if interrupted while waiting
*/
E poll(long timeout, TimeUnit unit)
throws InterruptedException;

allowCoreThreadTimeOut参数代表是否允许核心线程空转(实际上不是空转,而是阻塞),换句话说,如果allowCoreThreadTimeOut = true,那么在没有任务可做的时候,核心线程也会被回收。

这里假设设置了allowCoreThreadTimeOut = false用来保留核心线程。

假设现在线程数大于corePoolSize,如果设置了keepAliveTime,poll会等待keepAliveTime纳秒的时间,如果时间到后还没有取到任务,则timedOut = true,然后在下一轮循环的时候,判断allowCoreThreadTimeOut || wc > corePoolSize;为true(前面的假设),返回null,释放当前阻塞的线程。注意这里释放线程的时候并不区分是临时线程和核心线程,只是单纯的保证线程数量。也就是说,你最开始申请的线程是核心线程,但是在随后线程数量超过corePoolSize之后,参与竞争的是所有的核心线程和非核心线程,这时超时释放的线程并不一定是临时线程,也有可能是最初申请的核心线程。换句话说,所有的线程都是地位都是一样,所谓的核心线程只是一个代指,代指在竞争中存活下来的线程。

假设现在有4个核心线程和2个临时线程并设置了keepAliveTime为1s,如果现在所有的任务已经执行完毕后,这6个线程会同时阻塞在workQueue.poll(keepAliveTime, TimeUnit.NANOSECONDS) 这句,如果时间到了还没有任务到来,则销毁这6个线程中的随机两个。销毁两个后,再次循环判断的时候,allowCoreThreadTimeOut || wc > corePoolSize判断为false,剩下的4个线程阻塞在了workQueue.take()。

好了,最后一个问题,workQueue中的数据是哪里来的呢?前面介绍execute方法的时候讲过,如果新的方法到来,但是核心线程已经满了,这时会把数据插入到一个队列中,这个队列就是这里的workQueue

1
if (isRunning(c) && workQueue.offer(command)) {

三、Runnable和Thread(补充)

经常看到这样的总结:

Java中创建Thread的两种方式:

  1. 继承Thread类
  2. 实现Runnable接口

实际上这么说并不准确,并且会造成误导。

因为创建Thread的方式只有一种,那就是 new Thread(Runnable target)。

单纯的实现Runnable接口并没有任何作用,Runnable接口对比与其他接口并没有任何的特殊之处,实现Runnable接口的类也仅仅是多了一个名为run的方法。

之所以Runnable特殊是因为他是Thread的一个回调接口(关于回调,请参考Java的回调机制),Thread的构造函数接受一个Runnable类型的参数target,并持有这个参数,并在线程start后,调用run方法(Thread本身也实现了Runnable),然后里面调用了target的run方法:

1
2
3
4
5
6
@Override
public void run() {
if (target != null) {
target.run();
}
}

所以,Runnable接口如果脱离Thread使用,那么它和一个普通接口没有区别。

知道Runnable和Thread的关系之后,就可以灵活运用了:

创建一个匿名内部类

1
2
3
4
Thread t = new Thread(() -> {
System.out.println("继续");
});
t.start();

创建一个匿名Thread,并无限循环

1
2
3
4
5
new Thread(() -> {
while(true) {
System.out.println("继续");
}
}).start;

等等,你也可以单独创建一个类实现Runnable方法,然后使用这个类的实例去构建Thread。Thread还有很多重载的构造函数,可以给Thread命名等,不一一赘述。

不知道大家自己有没有考虑过线程池的实现,线程池的实现方式还是比较特殊的。其他的资源池可能会创建一些可以重复使用的类,然后放在一个集合里面(List、Set等),需要用到的时候拿一个出来,用完了再换回去。线程池并不是这么实现的,如果仔细阅读了ThreadPoolExecutor的源码,发现所有的线程内部都是一个循环,这个循环在没有任务的时候,就会阻塞,等有任务了之后,再竞争的这种做法。这是因为,一旦一个Thread执行完成(run方法退出),这个线程就不能用了,如果再次调用start方法,会抛出IllegalThreadStateException异常。这是因为线程执行完成之后,其状态会被虚拟机标志为TERMINATED,只有处于NEW状态的线程可以调用start方法:

1
2
3
4
5
6
7
8
9
10
11
12
public synchronized void start() {
/**
* This method is not invoked for the main method thread or "system"
* group threads created/set up by the VM. Any new functionality added
* to this method in the future may have to also be added to the VM.
*
* A zero status value corresponds to state "NEW".
*/
if (threadStatus != 0)
throw new IllegalThreadStateException();
....
}

线程的所有状态如下:

1
2
3
4
5
6
7
8
9
10
11
12
13
14
15
16
17
18
19
20
21
22
23
24
25
26
27
28
29
30
31
32
33
34
35
36
37
38
39
40
41
42
43
44
45
46
47
48
49
50
51
52
53
54
55
56
57
58
59
60
61
62
63
64
public enum State {
/**
* Thread state for a thread which has not yet started.
*/
NEW,

/**
* Thread state for a runnable thread. A thread in the runnable
* state is executing in the Java virtual machine but it may
* be waiting for other resources from the operating system
* such as processor.
*/
RUNNABLE,

/**
* Thread state for a thread blocked waiting for a monitor lock.
* A thread in the blocked state is waiting for a monitor lock
* to enter a synchronized block/method or
* reenter a synchronized block/method after calling
* {@link Object#wait() Object.wait}.
*/
BLOCKED,

/**
* Thread state for a waiting thread.
* A thread is in the waiting state due to calling one of the
* following methods:
* <ul>
* <li>{@link Object#wait() Object.wait} with no timeout</li>
* <li>{@link #join() Thread.join} with no timeout</li>
* <li>{@link LockSupport#park() LockSupport.park}</li>
* </ul>
*
* <p>A thread in the waiting state is waiting for another thread to
* perform a particular action.
*
* For example, a thread that has called <tt>Object.wait()</tt>
* on an object is waiting for another thread to call
* <tt>Object.notify()</tt> or <tt>Object.notifyAll()</tt> on
* that object. A thread that has called <tt>Thread.join()</tt>
* is waiting for a specified thread to terminate.
*/
WAITING,

/**
* Thread state for a waiting thread with a specified waiting time.
* A thread is in the timed waiting state due to calling one of
* the following methods with a specified positive waiting time:
* <ul>
* <li>{@link #sleep Thread.sleep}</li>
* <li>{@link Object#wait(long) Object.wait} with timeout</li>
* <li>{@link #join(long) Thread.join} with timeout</li>
* <li>{@link LockSupport#parkNanos LockSupport.parkNanos}</li>
* <li>{@link LockSupport#parkUntil LockSupport.parkUntil}</li>
* </ul>
*/
TIMED_WAITING,

/**
* Thread state for a terminated thread.
* The thread has completed execution.
*/
TERMINATED;
}

这个枚举类在Thread类里面,是一个嵌套枚举类(有必要区分一下嵌套和内部的区别,一般认为static标识的内部类为嵌套类,而不是内部类),里面保存了线程的六个状态,大家自行查看注释即可,不再赘述。

因此,线程池内的线程必然不能退出run方法,只能在runWorker方法中采用了一个死循环,为了避免线程空转(空转会消耗CPU资源),便使用一个BlockQueue把所有的线程阻塞住。所以ThreadPoolExecutor的内部线程是阻塞的。

四、 ThreadPoolExecutor基本用法

请看ThreadPoolExecutor的构造函数:

1
2
3
4
5
6
7
8
9
10
11
12
13
14
15
16
17
18
19
20
21
22
23
24
public ThreadPoolExecutor(int corePoolSize,
int maximumPoolSize,
long keepAliveTime,
TimeUnit unit,
BlockingQueue<Runnable> workQueue,
ThreadFactory threadFactory,
RejectedExecutionHandler handler) {
if (corePoolSize < 0 ||
maximumPoolSize <= 0 ||
maximumPoolSize < corePoolSize ||
keepAliveTime < 0)
throw new IllegalArgumentException();
if (workQueue == null || threadFactory == null || handler == null)
throw new NullPointerException();
this.acc = System.getSecurityManager() == null ?
null :
AccessController.getContext();
this.corePoolSize = corePoolSize;
this.maximumPoolSize = maximumPoolSize;
this.workQueue = workQueue;
this.keepAliveTime = unit.toNanos(keepAliveTime);
this.threadFactory = threadFactory;
this.handler = handler;
}
名称 含义 类型
corePoolSize 核心线程池大小 int
maximumPoolSize 最大线程池大小 int
keepAliveTime 线程最大空闲时间 long
unit 时间单位 TimeUnit
workQueue 任务等待队列 BlockingQueue
threadFactory 线程创建工厂 ThreadFactory
handler 拒绝策略 RejectedExecutionHandler

这里有几篇很棒的博客推荐一下:

线程池之ThreadPoolExecutor概述

线程池之ThreadPoolExecutor使用

后面一篇文章讲述了Executors.java中预定义的几个常用线程池(这是一种常见的静态工厂方法,见《Effective Java》第一章第一节,用法类似的还有Collections.java):(以下内容引用线程池之ThreadPoolExecutor使用这篇文章的内容):

1. FixedThreadPool

1
2
3
4
5
public static ExecutorService newFixedThreadPool(int nThreads) {
return new ThreadPoolExecutor(nThreads, nThreads,
0L, TimeUnit.MILLISECONDS,
new LinkedBlockingQueue<Runnable>());
}
  • corePoolSize与maximumPoolSize相等,即其线程全为核心线程,是一个固定大小的线程池,是其优势;
  • keepAliveTime = 0 该参数默认对核心线程无效,而FixedThreadPool全部为核心线程;
  • workQueue 为LinkedBlockingQueue(无界阻塞队列),队列最大值为Integer.MAX_VALUE。如果任务提交速度持续大余任务处理速度,会造成队列大量阻塞。因为队列很大,很有可能在拒绝策略前,内存溢出。是其劣势;
  • FixedThreadPool的任务执行是无序的;

适用场景:可用于Web服务瞬时削峰,但需注意长时间持续高峰情况造成的队列阻塞。

2. CachedThreadPool

1
2
3
4
5
public static ExecutorService newCachedThreadPool() {
return new ThreadPoolExecutor(0, Integer.MAX_VALUE,
60L, TimeUnit.SECONDS,
new SynchronousQueue<Runnable>());
}
  • corePoolSize = 0,maximumPoolSize = Integer.MAX_VALUE,即线程数量几乎无限制;
  • keepAliveTime = 60s,线程空闲60s后自动结束。
  • workQueue 为 SynchronousQueue 同步队列,这个队列类似于一个接力棒,入队出队必须同时传递,因为CachedThreadPool线程创建无限制,不会有队列等待,所以使用SynchronousQueue;

适用场景:快速处理大量耗时较短的任务,如Netty的NIO接受请求时,可使用CachedThreadPool。

3. SingleThreadExecutor

1
2
3
4
5
6
public static ExecutorService newSingleThreadExecutor() {
return new FinalizableDelegatedExecutorService
(new ThreadPoolExecutor(1, 1,
0L, TimeUnit.MILLISECONDS,
new LinkedBlockingQueue<Runnable>()));
}

这里多了一层FinalizableDelegatedExecutorService包装,这一层有什么用呢,对SingleThreadExecutor被包装后,无法成功向上转型,否则可以通过向上转型进行修改。因此,SingleThreadExecutor被定以后,无法修改,做到了真正的Single。

4. ScheduledThreadPoolExecutor

1
2
3
public static ScheduledExecutorService newScheduledThreadPool(int corePoolSize) {
return new ScheduledThreadPoolExecutor(corePoolSize);
}

newScheduledThreadPool调用的是ScheduledThreadPoolExecutor的构造方法,而ScheduledThreadPoolExecutor继承了ThreadPoolExecutor,构造是还是调用了其父类的构造方法。具体使用本文不做描述。

最后提一嘴,SynchronousQueue这个东西类似一个接力棒,里面只能存储一个东西,类似一个窗口,窗口的一边只能放一个东西,然后就要等待窗口的另一边取走这个东西。

有任何错误或者建议,欢迎指正

欢迎交流~